New users to Unity tend to ask about an integrated support for localization within the editor (built-in tools), currently Unity does not have this, so users ask for solutions and what’s available to get this setup. I found a free package on the asset store titled Language Manager – which is a key based system and easy to integrate multiple language support for your games and apps. Let’s take a deeper look into the package and highlight the ease of use in getting it setup:
Getting Started:
- Create an AssetStore Account if you haven’t got a UDN account setup already
- Do a search for Language Manager or follow this link for the browser version: https://www.assetstore.unity3d.com/#/content/1018
- Download and import the asset package into a new project – Best to test it out before directly importing into your current professional project
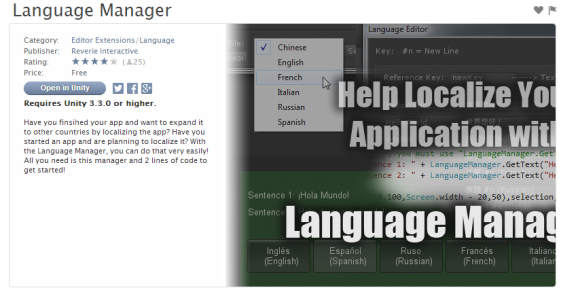
Within your new Unity project, you will see a folder named “LanguageManager” in the project window. The folder contains the scripts and resources needed to add localisation support to your game or app, included support already for 6 different languages. We shall take a quick look at the sample scene included.
Double click the sample scene to open – click the main camera in the hierarchy window and notice the script component named: TestScript.
The script contains:
- A GUI Selection Grid, allowing the user to press a GUI button to switch languages
- A public string which gives the option to select the default language in the inspector
- A Switch statement containing support for all 6 languages (English, Spanish, French, Italian, Chinese and Russian)
Hit play and observe the two GUI sentences at the top left of the game view are rendered in your chosen default language, the GUI buttons below allows the user to switch to a different language, clicking Russian will update the text to be displayed in Russian characters as well as for the GUI buttons. This example scene can be adapted to be used as a Language menu screen at the beginning of your game / app or in the main menu screen
It’s also worth mentioning you can get the system / OS language from an API call Application.systemLanguage – this returns the users OS default language, works on Mobile devices as well as PC, Mac and other major platforms, some are not supported so ensure to test that out. Example code for this in C# of course:
using UnityEngine;
using System.Collections;
public class OSLanguage : MonoBehaviour
{
void Update()
{
guiText.text = Application.systemLanguage.ToString();
}
}
Back to the LanguageManager package,. There is a custom Window included in the Unity Window drop down menu -> Language Editor, this allows the user to create new keys and create files for different languages (I imagine as many you like). The package contains support for an initializer – LanguageManager.LoadLanguageFile(defaultLanguage); and use it by calling – LanguageManager.GetText(“string key”); That’s where you relate your key’s added in the Language Editor window, for example the string key for English language is “english”. 🙂 – with just a few lines of code you can get basic support for multiple languages within your games / apps and apply them to GUI elements in your scene/s.
Take a look at the package, it’s a free download after all, also checkout the many other packages on the Asset Store here.
